03、Spring中的静态代理JDK动态代理CGLB动态代理
本文章主要讲解以下几个点:
1、代理模式
2、静态代理
3、JDK的动态代理
4、CGLB动态代理
1、代理模式
1、定义
给某一个对象提供一个代理,并由代理对象控制对原对象的引用。
2、通俗解释
比如:一个人(客户端)需要去租房子,但是找不到房子,就会去找中介(代理对象)租房子,真实的房子主人(真实对象)并不会被客户端知晓。所有的租房子操作都是由中介代理办理。
3、好处
- 代理模式能够协调调用者和被调用者,在一定程度上降低代码之间的耦合度。
- 实现了职责分离
2、静态代理
1、定义
在程序运行之前就已经存在代理类的字节码文件,代理对象和真实对象的关系在程序运行之前就确定了。(代理对象需要我们自己去手动创建)
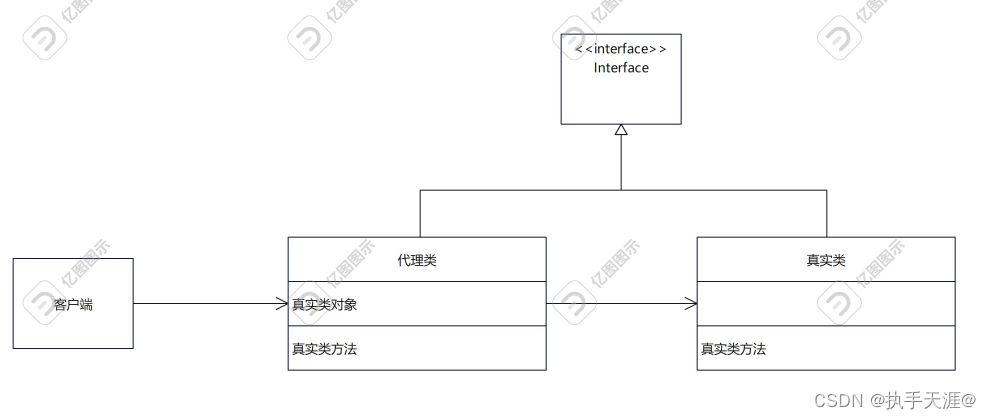
2、类图
3、 代码演示
1、 新建一个Maven项目导入如下依赖
<dependencies>
        <dependency>
            <groupId>org.springframework</groupId>
            <artifactId>spring-context</artifactId>
            <version>5.0.8.RELEASE</version>
        </dependency>
        <dependency>
            <groupId>org.springframework</groupId>
            <artifactId>spring-test</artifactId>
            <version>5.0.8.RELEASE</version>
            <scope>test</scope>
        </dependency>

        <dependency>
            <groupId>junit</groupId>
            <artifactId>junit</artifactId>
            <version>4.12</version>
            <scope>test</scope>
        </dependency>
2、提供一个接口
package cn.simplelife._01staticProxy;

/**
 * @ClassName IEmployeeService
 * @Description
 * @Author simplelife
 * @Date 2022/11/22 19:14
 * @Version 1.0
 */

public interface IEmployeeService {
    void save(String name, String password);
}
3、创建实现类实现接口
package cn.simplelife._01staticProxy.impl;

import cn.simplelife._01staticProxy.IEmployeeService;

/**
 * @ClassName IEmployeeServiceImpl
 * @Description
 * @Author simplelife
 * @Date 2022/11/22 19:15
 * @Version 1.0
 */

public class IEmployeeServiceImpl implements IEmployeeService {

    @Override
    public void save(String name, String password) {
        System.out.println("保存" + name);
    }
}
4、创建代理类实现接口
package cn.simplelife._01staticProxy.proxy;

import cn.simplelife._01staticProxy.IEmployeeService;
import cn.simplelife._01staticProxy.tx.MyTransaction;
import org.springframework.stereotype.Component;

/**
 * @ClassName IEmployeeProxy
 * @Description
 * @Author simplelife
 * @Date 2022/11/22 19:24
 * @Version 1.0
 */
@Component
public class IEmployeeProxy implements IEmployeeService {
    private MyTransaction myTransaction; // 事务管理对象
    private IEmployeeService target; // 代理类中的真实类对象

	// 因为使用的是XML配置方式,所以这里必须提供Set方法
    public void setMyTransaction(MyTransaction myTransaction) {
        this.myTransaction = myTransaction;
    }

    public void setTarget(IEmployeeService target) {
        this.target = target;
    }

    @Override
    public void save(String name, String password) {
        try {
            myTransaction.begin();
            // 真实类对象调用真实类的方法保存信息
            target.save(name, password);
            myTransaction.commit();
        } catch (Exception e) {
            myTransaction.rollback();
            e.printStackTrace();
        }
    }
}
5、使用Spring帮我们创建对象
<?xml version="1.0" encoding="UTF-8"?>
<beans xmlns="http://www.springframework.org/schema/beans"
       xmlns:xsi="http://www.w3.org/2001/XMLSchema-instance"
       xsi:schemaLocation="http://www.springframework.org/schema/beans http://www.springframework.org/schema/beans/spring-beans.xsd">

    <!--创建代理类对象-->
    <bean id="iEmployeeProxy" class="cn.simplelife._01staticProxy.proxy.IEmployeeProxy">
        <!--真实类对象-->
        <property name="target">
            <!--这种配置方式会隐藏真实类,客户端不会拿到真实类对象-->
            <bean class="cn.simplelife._01staticProxy.impl.IEmployeeServiceImpl"/>
        </property>
        <!--事务管理器-->
        <property name="myTransaction" ref="myTransaction"/>
    </bean>
    <!--创建事务管理器对象-->
    <bean id="myTransaction" class="cn.simplelife._01staticProxy.tx.MyTransaction"/>
</beans>
6、编写测试类进行测试
package cn.simplelife._01staticProxy.proxy;

import cn.simplelife._01staticProxy.IEmployeeService;
import org.junit.Test;
import org.junit.runner.RunWith;
import org.springframework.beans.factory.annotation.Autowired;
import org.springframework.test.context.ContextConfiguration;
import org.springframework.test.context.junit4.SpringJUnit4ClassRunner;
/**
 * @ClassName IEmployeeProxyTest
 * @Description
 * @Author simplelife
 * @Date 2022/11/22 19:29
 * @Version 1.0
 */
@RunWith(SpringJUnit4ClassRunner.class)
@ContextConfiguration("classpath:applicationContext.xml")
public class IEmployeeProxyTest {

    @Autowired
    private IEmployeeService iEmployeeService;

    @Test
    public void save() {
        System.out.println(iEmployeeService);
        iEmployeeService.save("张胜男","12315");
    }
}
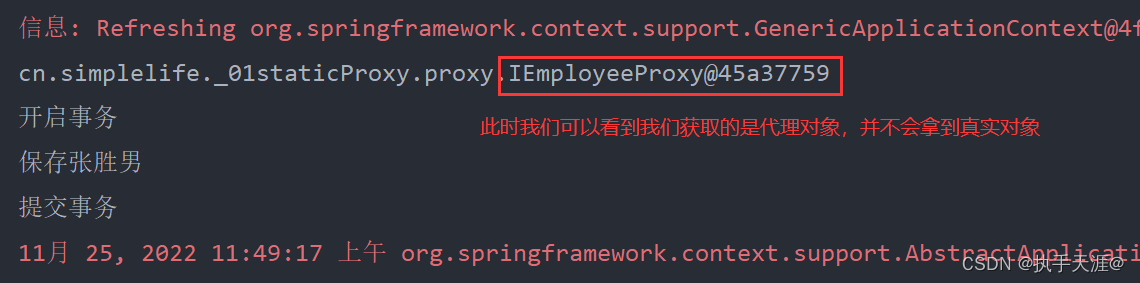
7、测试结果
3、JDK动态代理
1、相关API简介
1、java.lang.reflect.Proxy
-
Java 动态代理机制生成的所有动态代理类的父类,它提供了一组静态方法来为一组接口动态地生成代理类及其对象。
-
主要方法
public static Object newProxyInstance(ClassLoader loader, Class<?>[] interfaces, InvocationHandler hanlder)
-
方法职责:为指定类加载器、一组接口及调用处理器生成动态代理类实例。
-
参数:
- loader:类加载器,一般传递真实对象的类加载器
- interfaces:代理类所需要实现的接口
- hanlder:代理执行处理器,代理对象需要做的事情。
-
返回值:创建的代理对象。
2、java.lang.reflect.InvocationHandler
- 主要方法
public Object invoke(Object proxy, Method method, Object[] args)
-
方法职责:负责集中处理动态代理类上的所有方法调用,让使用者自定义做什么事情,对原来方法增强。
-
参数:
- proxy :生成的代理对象;
- method:当前调用的真实方法对象;
- args :当前调用方法的实参。
-
返回值:真实方法的返回结果。
2、优缺点
1、优点
- 对比静态代理,我们不需要手动创建代理类。
2、缺点
- 真实类必须实现接口。
- 对多个真实对象进行代理的话,若使用 Spring 的话配置太多了,要手动创建代理对象,用起来麻烦。
3、代码演示
1、 新建一个Maven项目导入如下依赖
<dependencies>
        <dependency>
            <groupId>org.springframework</groupId>
            <artifactId>spring-context</artifactId>
            <version>5.0.8.RELEASE</version>
        </dependency>
        <dependency>
            <groupId>org.springframework</groupId>
            <artifactId>spring-test</artifactId>
            <version>5.0.8.RELEASE</version>
            <scope>test</scope>
        </dependency>

        <dependency>
            <groupId>junit</groupId>
            <artifactId>junit</artifactId>
            <version>4.12</version>
            <scope>test</scope>
        </dependency>
2、提供一个接口
package cn.simplelife._01staticProxy;

/**
 * @ClassName IEmployeeService
 * @Description
 * @Author simplelife
 * @Date 2022/11/22 19:14
 * @Version 1.0
 */

public interface IEmployeeService {
    void save(String name, String password);
}
3、创建实现类实现接口
package cn.simplelife._01staticProxy.impl;

import cn.simplelife._01staticProxy.IEmployeeService;

/**
 * @ClassName IEmployeeServiceImpl
 * @Description
 * @Author simplelife
 * @Date 2022/11/22 19:15
 * @Version 1.0
 */

public class IEmployeeServiceImpl implements IEmployeeService {

    @Override
    public void save(String name, String password) {
        System.out.println("保存" + name);
    }
}
4、编写代理执行处理器类
package cn.simplelife.jdkproxy.handler;

import cn.simplelife.jdkproxy.tx.MyTransactionManger;

import java.lang.reflect.InvocationHandler;
import java.lang.reflect.InvocationTargetException;
import java.lang.reflect.Method;

/**
 * @ClassName IEmployeeServiceProxy
 * @Description
 * @Author simplelife
 * @Date 2022/11/22 19:55
 * @Version 1.0
 */

public class TransactionInvocationHandler implements InvocationHandler {
    private MyTransactionManger myTransactionManger; // 事务管理器
    private Object target; // 真实对象

    public void setMyTransactionManger(MyTransactionManger myTransactionManger) {
        this.myTransactionManger = myTransactionManger;
    }

    public void setTarget(Object target) {
        this.target = target;
    }

    public Object getTarget() {
        return target;
    }

    @Override
    public Object invoke(Object proxy, Method method, Object[] args) throws Throwable {
        Object invoke = null;
        try {
            myTransactionManger.begin();
            // 真实对象调用方法
            invoke = method.invoke(target, args);
            myTransactionManger.commit();
        } catch (IllegalAccessException | IllegalArgumentException | InvocationTargetException e) {
            myTransactionManger.rock();
            e.printStackTrace();
        }
        return invoke;
    }
}
5、使用Spring帮我们创建对象
<?xml version="1.0" encoding="UTF-8"?>
<beans xmlns="http://www.springframework.org/schema/beans"
       xmlns:xsi="http://www.w3.org/2001/XMLSchema-instance"
       xsi:schemaLocation="http://www.springframework.org/schema/beans http://www.springframework.org/schema/beans/spring-beans.xsd">

    <bean id="employeeServiceProxy" class="cn.simplelife.jdkproxy.handler.TransactionInvocationHandler">
        <property name="target">
            <bean class="cn.simplelife.jdkproxy.impl.IEmployeeServiceImpl"/>
        </property>
        <property name="myTransactionManger" ref="myTransactionManger"/>
    </bean>
    <bean id="myTransactionManger" class="cn.simplelife.jdkproxy.tx.MyTransactionManger"/>
</beans>
6、编写测试类进行测试
package cn.simplelife.jdkproxy.handler;

import cn.simplelife.jdkproxy.IEmployeeService;
import cn.simplelife.jdkproxy.impl.IEmployeeServiceImpl;
import cn.simplelife.jdkproxy.tx.MyTransactionManger;
import org.junit.Test;
import org.junit.runner.RunWith;
import org.springframework.beans.factory.annotation.Autowired;
import org.springframework.test.context.ContextConfiguration;
import org.springframework.test.context.junit4.SpringJUnit4ClassRunner;

import java.lang.reflect.Proxy;

/**
 * @ClassName IEmployeeServiceProxyTest
 * @Description
 * @Author simplelife
 * @Date 2022/11/22 19:58
 * @Version 1.0
 */
@RunWith(SpringJUnit4ClassRunner.class)
@ContextConfiguration("classpath:applicationContext.xml")
public class IEmployeeServiceProxyTest {

    @Autowired
    private TransactionInvocationHandler invocationHandler;

    @Test
    public void testJDKProxy() {
        invocationHandler.setMyTransactionManger(new MyTransactionManger());
        invocationHandler.setTarget(new IEmployeeServiceImpl());
        IEmployeeService proxyInstance = (IEmployeeService) Proxy.newProxyInstance(
                this.getClass().getClassLoader(),
                invocationHandler.getTarget().getClass().getInterfaces(),
                invocationHandler
        );
        proxyInstance.save("李四", "11345");
    }
}
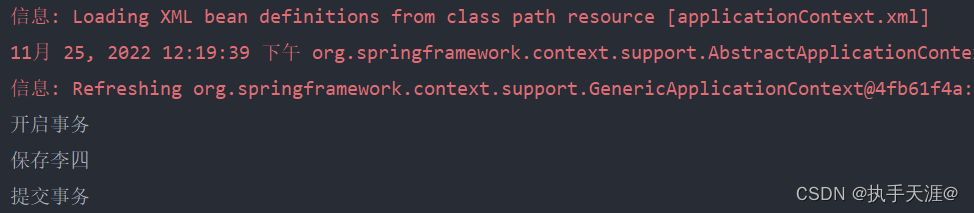
7、测试结果
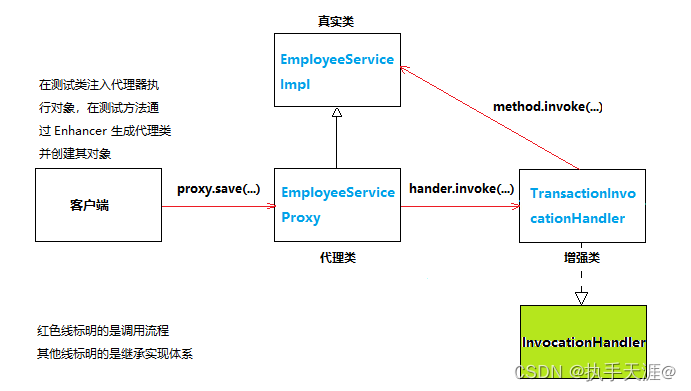
8、底层分析图解
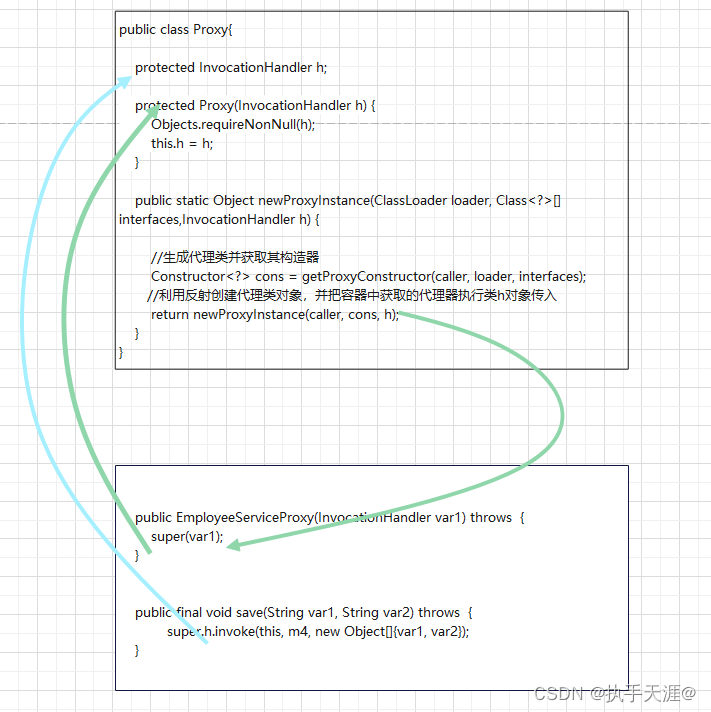
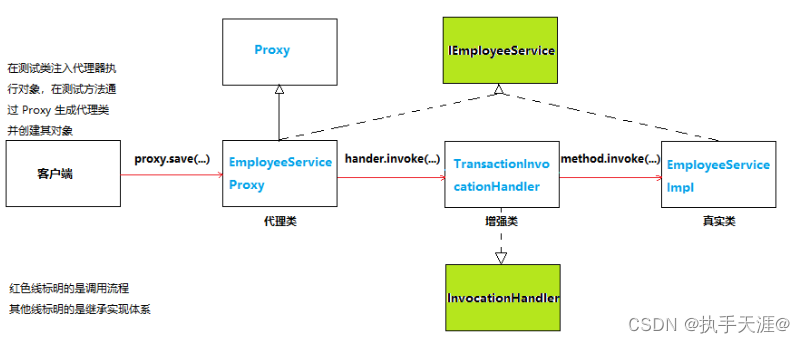
9、调用流程
4、CGLB动态代理
1、相关API简介
1、org.springframework.cglib.proxy.Enhancer
类似 JDK 中 Proxy,用来生成代理类创建代理对象的。
2、org.springframework.cglib.proxy.InvocationHandler
类似 JDK 中 InvocationHandler,让使用者自定义做什么事情,对原来方法增强。
2、代码演示
1、修改代理执行处理器类
- 修改其实现接口为 org.springframework.cglib.proxy.InvocationHandler,其他不变。
2、修改单元测试类
package cn.simplelife.cjlbproxy.impl;

import cn.simplelife.cjlbproxy.IEmployeeService;
import cn.simplelife.cjlbproxy.handler.TransactionInvokeHandler;
import org.junit.Test;
import org.junit.runner.RunWith;
import org.springframework.beans.factory.annotation.Autowired;
import org.springframework.cglib.proxy.Enhancer;
import org.springframework.test.context.ContextConfiguration;
import org.springframework.test.context.junit4.SpringJUnit4ClassRunner;

/**
 * @ClassName IEmployeeServiceImplTest
 * @Description
 * @Author simplelife
 * @Date 2022/11/22 15:38
 * @Version 1.0
 */
@RunWith(SpringJUnit4ClassRunner.class)
@ContextConfiguration("classpath:applicationContext.xml")
public class IEmployeeServiceImplTest {

    @Autowired
    private TransactionInvokeHandler transactionInvokeHandler;

    @Test
    public void save() {
        Enhancer enhancer = new Enhancer();
        // 生产的代理类是继承真实类的
        enhancer.setSuperclass(transactionInvokeHandler.getTarget().getClass());
        // 生成的代理类对象要做的事情
        enhancer.setCallback(transactionInvokeHandler);
        // 接收生成的代理类
        IEmployeeService iEmployeeService = (IEmployeeService) enhancer.create();

        iEmployeeService.save("yyy", "123");
    }
}
3、测试结果

4、调用流程